Basic Counter App
A full copy of the code for this page is available in the github repository for the website at:
https://github.com/ratatui/ratatui-website/tree/main/code/tutorials/counter-app-basic.
Create a new project
Section titled “Create a new project”Create a new rust project and open it in your editor
cargo new ratatui-counter-appcd ratatui-counter-app$EDITOR .Add the Ratatui and Crossterm crates (See backends for more info on why we use Crossterm).
cargo add ratatui crosstermThe Cargo.toml will now have the following in the dependencies section:
[dependencies]ratatui = "0.30.2"crossterm = "0.29.0"Application Setup
Section titled “Application Setup”Main Imports
Section titled “Main Imports”In main.rs, add the necessary imports for Ratatui and crossterm. These will be used later in this
tutorial. In the tutorials, we generally use wildcard imports to simplify the code, but you’re
welcome to use explicit imports if that is your preferred style.
use std::io;
use crossterm::event::{self, Event, KeyCode, KeyEvent, KeyEventKind};use ratatui::{ buffer::Buffer, layout::Rect, style::Stylize, symbols::border, text::{Line, Text}, widgets::{Block, Paragraph, Widget}, DefaultTerminal, Frame,};Main Function
Section titled “Main Function”A common pattern found in most Ratatui apps is that they:
- Initialize the terminal
- Run the application in a loop until the user exits the app
- Restore the terminal back to its original state
The main function calls ratatui::run(). The ratatui::run() function sets up the terminal by
calling the ratatui::init and ratatui::restore methods and then creates and runs the App
(defined later). It defers propagating the return of App::run()’s result until after the terminal
is restored to ensure that any Error results will be displayed to the user after the application
exits.
Fill out the main function:
fn main() -> io::Result<()> { ratatui::run(|terminal| App::default().run(terminal))}Application State
Section titled “Application State”The counter app needs to store a small amount of state, a counter and a flag to indicate that the application should exit. The counter will be an 8-bit unsigned int, and the exit flag can be a simple bool. Applications that have more than one main state or mode might instead use an enum to represent this flag.
Create an App struct to represent your application’s state:
#[derive(Debug, Default)]pub struct App { counter: u8, exit: bool,}Calling App::default() will create an App initialized with counter set to 0, and exit set to
false.
Application Main loop
Section titled “Application Main loop”Most apps have a main loop that runs until the user chooses to exit. Each iteration of the loop
draws a single frame by calling Terminal::draw() and then updates the state of the app.
Create an impl block for the App with a new run method that will act as the application’s main
loop:
impl App {
    /// runs the application's main loop until the user quits    pub fn run(&mut self, terminal: &mut DefaultTerminal) -> io::Result<()> {        while !self.exit {            terminal.draw(|frame| self.draw(frame))?;            self.handle_events()?;        }        Ok(())    }
    fn draw(&self, frame: &mut Frame) {        todo!()    }
    fn handle_events(&mut self) -> io::Result<()> {        todo!()    }}
Displaying the application
Section titled “Displaying the application”Render a Frame
Section titled “Render a Frame”To render the UI, an application calls Terminal::draw() with a closure that accepts a Frame. The
most important method on Frame is render_widget() which renders any type that implements the
Widget trait such as Paragraph, List etc. We will implement the Widget
trait for the App struct so that the code related to rendering is organized in a single place.
This allows us to call Frame::render_widget() with the app in the closure passed to
Terminal::draw.
First, add a new impl Widget for &App block. We implement this on a reference to the App type, as
the render function will not mutate any state, and we want to be able to use the app after the call
to draw. The render function will create a block with a title, instruction text on the bottom, and
some borders. Render a Paragraph widget with the application’s state (the value of the Apps
counter field) inside the block. The block and paragraph will take up the entire size of the widget:
impl Widget for &App {    fn render(self, area: Rect, buf: &mut Buffer) {        let title = Line::from(" Counter App Tutorial ".bold());        let instructions = Line::from(vec![            " Decrement ".into(),            "<Left>".blue().bold(),            " Increment ".into(),            "<Right>".blue().bold(),            " Quit ".into(),            "<Q> ".blue().bold(),        ]);        let block = Block::bordered()            .title(title.centered())            .title_bottom(instructions.centered())            .border_set(border::THICK);
        let counter_text = Text::from(vec![Line::from(vec![            "Value: ".into(),            self.counter.to_string().yellow(),        ])]);
        Paragraph::new(counter_text)            .centered()            .block(block)            .render(area, buf);    }}
Next, render the app as a widget:
impl App { fn draw(&self, frame: &mut Frame) { frame.render_widget(self, frame.area()); }}Testing the UI Output
Section titled “Testing the UI Output”To test how Ratatui will display the widget when render is called, you can render the app to a
buffer in a test.
Add the following tests module to main.rs:
#[cfg(test)]mod tests {    use super::*;    use ratatui::style::Style;
    #[test]    fn render() {        let app = App::default();        let mut buf = Buffer::empty(Rect::new(0, 0, 50, 4));
        app.render(buf.area, &mut buf);
        let mut expected = Buffer::with_lines(vec![            "┏━━━━━━━━━━━━━ Counter App Tutorial ━━━━━━━━━━━━━┓",            "┃                    Value: 0                    ┃",            "┃                                                ┃",            "┗━ Decrement <Left> Increment <Right> Quit <Q> ━━┛",        ]);        let title_style = Style::new().bold();        let counter_style = Style::new().yellow();        let key_style = Style::new().blue().bold();        expected.set_style(Rect::new(14, 0, 22, 1), title_style);        expected.set_style(Rect::new(28, 1, 1, 1), counter_style);        expected.set_style(Rect::new(13, 3, 6, 1), key_style);        expected.set_style(Rect::new(30, 3, 7, 1), key_style);        expected.set_style(Rect::new(43, 3, 4, 1), key_style);
        assert_eq!(buf, expected);    }}
To run this test run the following in your terminal:
cargo testYou should see:
running 1 testtest tests::render ... ok
test result: ok. 1 passed; 0 failed; 0 ignored; 0 measured; 0 filtered out; finished in 0.00s
Interactivity
Section titled “Interactivity”The application needs to accept events that come from the user via the standard input. The only events this application needs to worry about are key events. For information on other available events, see the Crossterm events module docs. These include window resize and focus, paste, and mouse events.
In more advanced applications, events might come from the system, over the network, or from other parts of the application.
Handle Events
Section titled “Handle Events”The handle_events method that you defined earlier is where the app will wait for and handle any
events that are provided to it from crossterm.
Update the handle_events method that you defined earlier:
impl App {
    // -- snip --
/// updates the application's state based on user input fn handle_events(&mut self) -> io::Result<()> { match event::read()? { // it's important to check that the event is a key press event as // crossterm also emits key release and repeat events on Windows. Event::Key(key_event) if key_event.kind == KeyEventKind::Press => { self.handle_key_event(key_event) } _ => {} }; Ok(()) }}Handle Keyboard Events
Section titled “Handle Keyboard Events”Your counter app will update the state of the App struct’s fields based on the key that was
pressed. The keyboard event has two fields of interest to this app:
kind: It’s important to check that this equalsKeyEventKind::Pressas otherwise your application may see duplicate events (for key down, key repeat, and key up).code: theKeyCoderepresenting which specific key that was pressed.
Add a handle_key_event method to App, to handle the key events.
impl App {
    // -- snip --
    fn handle_key_event(&mut self, key_event: KeyEvent) {        match key_event.code {            KeyCode::Char('q') => self.exit(),            KeyCode::Left => self.decrement_counter(),            KeyCode::Right => self.increment_counter(),            _ => {}        }    }}
Next, add some methods to handle updating the application’s state. It’s usually a good idea to define these on the app rather than just in the match statement as it gives you an easy way to unit test the application’s behavior separately to the events.
impl App {
    // -- snip --
    fn exit(&mut self) {        self.exit = true;    }
    fn increment_counter(&mut self) {        self.counter += 1;    }
fn decrement_counter(&mut self) { self.counter -= 1; }}Testing Keyboard Events
Section titled “Testing Keyboard Events”Splitting the keyboard event handling out to a separate function like this makes it easy to test the application without having to emulate the terminal. You can write tests that pass in keyboard events and test the effect on the application.
Add tests for handle_key_event in the tests module.
#[cfg(test)]mod tests {
    // -- snip --
    #[test]    fn handle_key_event() {        let mut app = App::default();        app.handle_key_event(KeyCode::Right.into());        assert_eq!(app.counter, 1);
        app.handle_key_event(KeyCode::Left.into());        assert_eq!(app.counter, 0);
        let mut app = App::default();        app.handle_key_event(KeyCode::Char('q').into());        assert!(app.exit);    }}
Run the tests.
cargo testYou should see:
running 2 teststest tests::handle_key_event ... oktest tests::render ... ok
test result: ok. 2 passed; 0 failed; 0 ignored; 0 measured; 0 filtered out; finished in 0.00s
The Finished App
Section titled “The Finished App”Putting this altogether, you should now have the following files:
main.rs (click to expand)
use std::io;
use crossterm::event::{self, Event, KeyCode, KeyEvent, KeyEventKind};use ratatui::{    buffer::Buffer,    layout::Rect,    style::Stylize,    symbols::border,    text::{Line, Text},    widgets::{Block, Paragraph, Widget},    DefaultTerminal, Frame,};
fn main() -> io::Result<()> {    ratatui::run(|terminal| App::default().run(terminal))}
#[derive(Debug, Default)]pub struct App {    counter: u8,    exit: bool,}
impl App {    /// runs the application's main loop until the user quits    pub fn run(&mut self, terminal: &mut DefaultTerminal) -> io::Result<()> {        while !self.exit {            terminal.draw(|frame| self.draw(frame))?;            self.handle_events()?;        }        Ok(())    }
    fn draw(&self, frame: &mut Frame) {        frame.render_widget(self, frame.area());    }
    /// updates the application's state based on user input    fn handle_events(&mut self) -> io::Result<()> {        match event::read()? {            // it's important to check that the event is a key press event as            // crossterm also emits key release and repeat events on Windows.            Event::Key(key_event) if key_event.kind == KeyEventKind::Press => {                self.handle_key_event(key_event)            }            _ => {}        };        Ok(())    }
    fn handle_key_event(&mut self, key_event: KeyEvent) {        match key_event.code {            KeyCode::Char('q') => self.exit(),            KeyCode::Left => self.decrement_counter(),            KeyCode::Right => self.increment_counter(),            _ => {}        }    }
    fn exit(&mut self) {        self.exit = true;    }
    fn increment_counter(&mut self) {        self.counter += 1;    }
    fn decrement_counter(&mut self) {        self.counter -= 1;    }}
impl Widget for &App {    fn render(self, area: Rect, buf: &mut Buffer) {        let title = Line::from(" Counter App Tutorial ".bold());        let instructions = Line::from(vec![            " Decrement ".into(),            "<Left>".blue().bold(),            " Increment ".into(),            "<Right>".blue().bold(),            " Quit ".into(),            "<Q> ".blue().bold(),        ]);        let block = Block::bordered()            .title(title.centered())            .title_bottom(instructions.centered())            .border_set(border::THICK);
        let counter_text = Text::from(vec![Line::from(vec![            "Value: ".into(),            self.counter.to_string().yellow(),        ])]);
        Paragraph::new(counter_text)            .centered()            .block(block)            .render(area, buf);    }}
#[cfg(test)]mod tests {
    use super::*;    use ratatui::style::Style;
    #[test]    fn render() {        let app = App::default();        let mut buf = Buffer::empty(Rect::new(0, 0, 50, 4));
        app.render(buf.area, &mut buf);
        let mut expected = Buffer::with_lines(vec![            "┏━━━━━━━━━━━━━ Counter App Tutorial ━━━━━━━━━━━━━┓",            "┃                    Value: 0                    ┃",            "┃                                                ┃",            "┗━ Decrement <Left> Increment <Right> Quit <Q> ━━┛",        ]);        let title_style = Style::new().bold();        let counter_style = Style::new().yellow();        let key_style = Style::new().blue().bold();        expected.set_style(Rect::new(14, 0, 22, 1), title_style);        expected.set_style(Rect::new(28, 1, 1, 1), counter_style);        expected.set_style(Rect::new(13, 3, 6, 1), key_style);        expected.set_style(Rect::new(30, 3, 7, 1), key_style);        expected.set_style(Rect::new(43, 3, 4, 1), key_style);
        assert_eq!(buf, expected);    }
    #[test]    fn handle_key_event() {        let mut app = App::default();        app.handle_key_event(KeyCode::Right.into());        assert_eq!(app.counter, 1);
        app.handle_key_event(KeyCode::Left.into());        assert_eq!(app.counter, 0);
        let mut app = App::default();        app.handle_key_event(KeyCode::Char('q').into());        assert!(app.exit);    }}
Running the app
Section titled “Running the app”Make sure you save all the files and that the imports listed above are still at the top of the file (some editors remove unused imports automatically).
Now run the app:
cargo runYou will see the following UI:
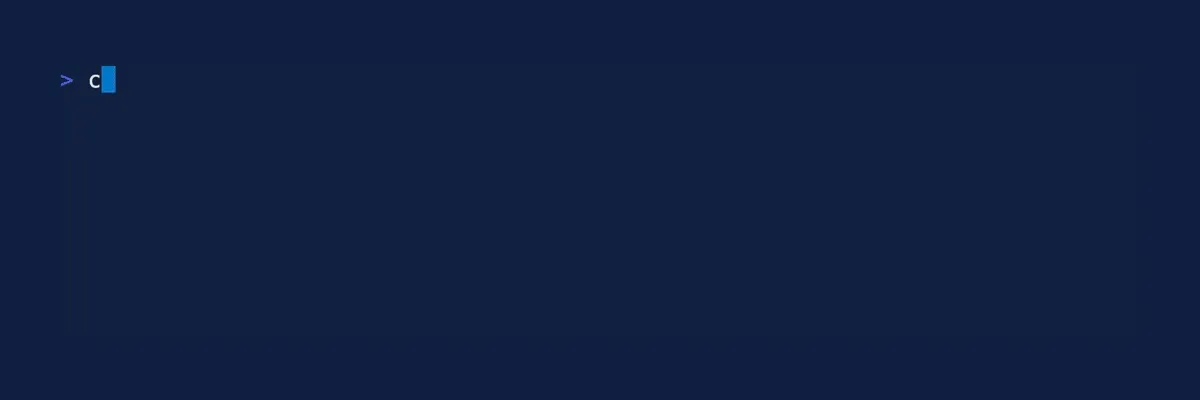
Press the Left and Right arrow keys to interact with the counter. Press Q to quit.
Note what happens when you press Left when the counter is 0.
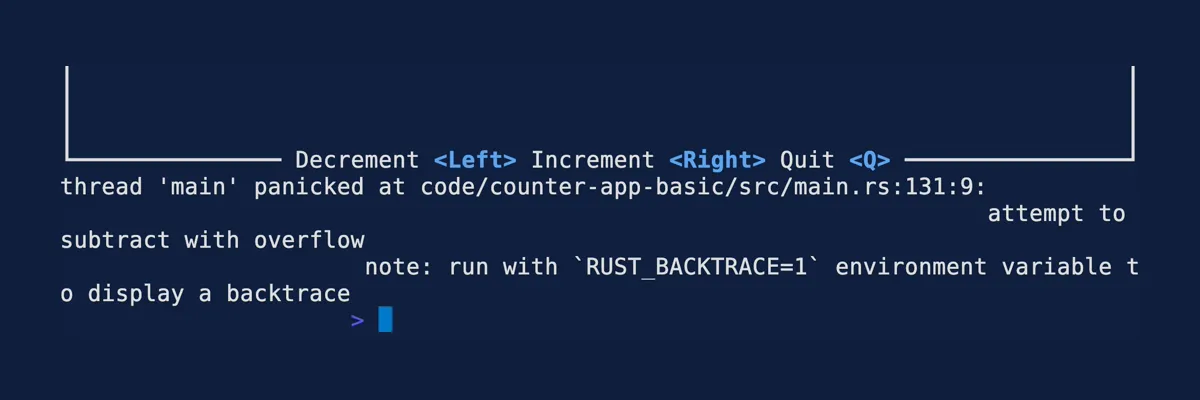
On a Mac / Linux console you can run reset to fix the console. On a Windows console, you may need
to restart the console to clear the problem. We will properly handle this in the next section of
this tutorial on Error Handling.
Conclusion
Section titled “Conclusion”By understanding the structure and components used in this simple counter application, you are set
up to explore crafting more intricate terminal-based interfaces using ratatui.